Wednesday, November 30, 2022

DIY Series 31: Easy Installation of Kinetic Wireless Battery-Free Doorbell

Thinking of installing a new door bell, but there is no wiring available? or the existing door bell spoilt and looking for replacement?

Here is the solution. Battery-free wireless doorbell requires no battery and no wiring. It is totally hassle free, easy to install, and maintenance free.

It uses a unique technology for energy harvesting with ultra-low-power wireless technology (pending for worldwide patents). 

When users press the bell button, energy converting module inside will change the mechanical energy into electric energy. Then the wireless module of the button sends the signals to receiver. The receiver receives the signals and plays music / react accordingly. 

Advantage of Kinetic Battery-Free Doorbell

1. Battery-free bell button (use kinetic energy)
2. No wire (wireless transmission)
3. Long working range (100m to 150m)
4. Multiple melodies and sound levels (on your choice)
5. Easy installation (hassle free)
6. Waterproof and anti-sunshine (worry free)

Users are freely to configure it in various combination, according to the actual needs. You may pair multiple chimes to a single button (Type 1), or multiple buttons pair to a single chime (Type 2).

Type 1: Add chimes, no limit to the number of chimes. Just add chimes as needed. 
Type 2: Add buttons, maximum of 3 buttons can be learned to a single chime.


There are 2 models commonly available, E2 Model and N1 Model.
E2: Basic unit, no memory function and no self-learning mode. Cheaper in price.
N1: Programmable unit, with memory function and self-learning mode. Slightly higher price.


Self-Learning Function:

With this Self-Learning function, it is available to pair additional buttons and chimes by yourself. This is perfect for the houses with many doors or many rooms. Maximum of 3 buttons can be learnt to a single chime.

There is no limit for the numbers of the chimes, you can add as many chimes as you want to pair with one button.

Repeater Function:

Each chime can be a repeater, plug in the repeater in the middle of the working range, this set of doorbell can easily reach to distance of over 200m in an open area.

Easy Installation:

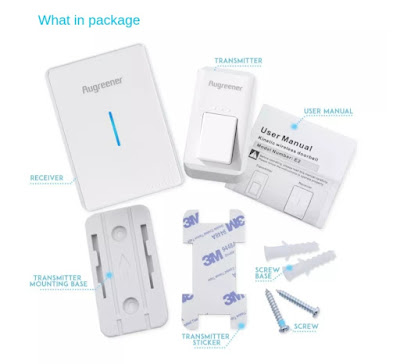
The battery-free wireless doorbell consists of transmitter (button) and receiver (chime). Just place the transmitter at the door / gate, and plug in the receiver into any 13A power point.


I personally had been using this Kinetic Wireless Battery-Free Doorbell for more than 3 years. Till now, my unit is still in good condition. 

Good News:

After chatting with the Lazada AnyHo Store, the seller offer a special discount for my blog readers. Min spend RM45 to get 10% off (capped at RM10) and storewide.

Please click the link below for the SPECIAL DISCOUNT only available at here:


Place your order while this voucher is still valid :)

Friday, November 25, 2022

DIY Series 30: Installation of Home Surveillance PTZ Security Camera (XiaoVV P6 WiFi Solar Edition)

Pan-Tilt-Zoom (PTZ) cameras are built with mechanical parts that allow them to swivel left to right, tilt up and down, and zoom in and out of a scene. They’re typically used to monitor wide open areas up to 360-degree viewable angles, and monitor them through a remote camera controller. Depending on the camera or software, they can also be set to automatically follow motion-triggered activity or adhere to a pre-set schedule. PTZ cameras are generally implemented in tandem with a larger surveillance system, in which the PTZ tracks movement while a fixed camera takes detailed shots.


Selection of correct Surveillance Security Camera is very important, it solely depends on your target purpose, installation location and also budget allocated. Make sure it is using H.265 video encoding, which it deliver higher video quality. 


First, I set my target to choose a PTZ camera as I wish to cover maximum view of angle (up, down, left, right, zoom). Next, I want to install at my house car porch / main gate and I do not have any power point / wiring available readily at the target installation location. Lastly, I only budget about RM300 for a unit of PTZ Surveillance Security Camera.

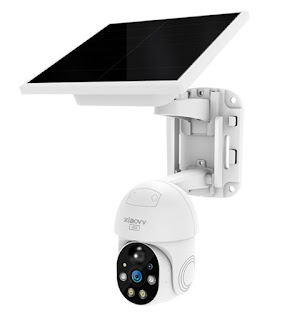
Hence, I searched online and found this specific model, "XiaoVV P6" model match my target criteria, it available in 2 models, WiFi version and 4G SimCard version. Besides, it is powered either by DC 5V via USB cable (comes with DC Power Adaptor) or solar panel. 


It also comes with several brackets (for solar panel + PTZ Camera), for multiple options of mounting installation.

Integrated Installation (All-in-One Bracket)

Separate Installation (Using Two Brackets)

I had proceed to place an order at Lazada on 11.11, for a "XiaoVV P6 WiFi Solar-Powered" model. I also purchased a 128GB SD Card separately. All together costs me below RM300 (during 11.11 sale, after discount).

Main Features:
1. Remote monitoring
2. Motion detection, alarm push
3. Full color night vision
4. Voice intercom
5. Cloud Storage (optional service required payment)
6. Wireless connection
7. Mobile Tracking
8. Preset position, automatic cruise
9. Active alarm
10 Horizontal direction: 355°, Vertical direction: 110°
11.IP65 dustproof and waterproof
13. Human detection
14. Sound and light alarm, full color night vision
15. Resolution: 2MP


This PTZ camera have full colour night vision with Infrared and LED light. Best of all, it is a PTZ camera with Horizontal direction view up to 355°, Vertical direction view up to 110°.

Since there is no power / wiring needed, the installation is pretty simple. I choose for separate installation (PTZ camera and solar panel at different location), for maximum coverage of solar charging.

Holes location stickers provided to assist you to drill the holes needed at correct location.


To install, just drill 3 holes (6mm size) for the camera bracket, then another 4 holes (6mm size) for solar panel bracket. Stickers was provided to indicate the location of the holes required.


There are 2 options of power supply mode available in this model. I opted for solar-powered, thus I just leave the DC Power Cable aside without any connection.


Once placed the camera and solar panel into the dedicated bracket, you just need to connect the power cable between camera and solar panel to power 


Slot in the SD Card at the bottom of the camera.


Lastly, look for the switch at the bottom of the solar panel and turn on the battery supply.


To conclude, after installation, follow 3 easy steps to complete network configuration setup as below:


You can download the APP using from the QR Code below. Refer to the user manual provided, setup is pretty easy and straight forward. You can also download the PC Client Software installer at XiaoVV homepage.


To my surprise, the APP is having a pretty good GUI and many control features. It can support up to 4 cameras within the same screen (for viewing). Thus, you can add up to 4 devices under the same screen, and more cameras within the same account for easy management. Beside PTZ functions, it has PIR motion sensor, where the camera will only in recording mode when there is any movement detected. This will further prolong the battery usage especially during nighttime where there is no charging possible with solar panel.

Single Device View

Up to 4 Devices View

You can use the alarm in auto mode / manual mode to have a push warning message to warn the intruder. You can also use it as voice intercom for bi-directional communication. It also support timeline / event set video playback. 

Timeline Playback View

Event Playback View 

From the APP GUI, you can easily check the WiFi signal strength (e.g.: -57dBm) and battery charging / battery status. 


Solar panel will charge the battery in the day time, and it is more than sufficient to supply battery power to the PTZ camera for daily operation. (My existing solar panel located at porch roof top, is able to start charging from 08:30 to 17:00, which is in the range of best case scenario)

Look for a suitable PTZ camera and start your own DIY installation. If you have no idea which one to choose, just give it a try on XiaoVV P6 WiFi Solar-Powered PTZ Camera. It is affordable with plenty of features included.

Good News:

After chatting with the Lazada XiaoVV Flagship Store, the seller agreed to provide a special discount for my blog readers. It is applicable to selected products in the store.

Please click the link below for the SPECIAL DISCOUNT only available at here:


Place your order while this voucher is still valid :) https://s.lazada.com.my/s.gLJaI?cc

DIY Series 29: Basic Repair of Fridge / Freezer

The only difference between a refrigerator (fridge) and a freezer is temperature range. The freezer maintain the core temperature as low as -18 degrees Celsius. For a fridge, it needs to be set at about -6 degrees Celsius to 10 degrees Celsius. As for the electrical / electronic design, it should be almost the same concept to understand the whole system.

Most fridges are having freezer at top / bottom compartment, depends on makers & models. However, only certain freezer can work as fridge, and most of the are solely act as freezer by itself.

Example of Freezer (Hisense Freezer Model FC125D4BWS)

Fridge / Freezer is not so difficult to understand, from the circuit diagram point of view. You can refer to the circuit diagram below to identify the main parts involved. I use the common circuit diagram of a freezer as example:


Main Parts:
1) Compressor (most expensive part in the freezer)
2) PTC (Positive Temperature Coefficient) Starter / Relay
3) Overload Protector
4) Thermostat
5) etc...

If your refrigerator stops producing cold air, there may be something wrong with the PTC Relay, also known as the start relay. The PTC relay starts the compressor inside the fridge to make cold air so your food stays cool. 

Luckily, the PTC relay is something you can easily check and replace yourself if you need to. After you access the relay and compressor on your fridge, use a multimeter to test the ports to make sure it has a low resistance. If the relay still works, you may also need to check the compressor to make sure it’s still functioning.

Accessing the Relay / Overload

1) Unplug your freezer, to prevent any possible of electric shock
2) Remove the lower back / side panel from your freezer to access the PTC Relay & Overload Protector
3) Grab the top of the plastic cover and carefully pull it off from the compressor to expose the relay / overload inside
4) Disconnect the wires from the relay. Disconnect each wire from place so you’re able to remove the relay.
5) Remove the relay by pulling it off of the prongs. The relay should easily slide off of the prongs and disconnect from the compressor so you can test it.

Example of Compressor (inside Khind Freezer Model FZ102)

Location of PTC Relay & Overload at Compressor (after unplug)

Example of Overload & PTC Relay (22Ohm)

Checking the Relay with a Multimeter

1) Look for burnt marks around the ports on the relay to see if it’s shorted. If the relay is still intact, then continue testing it using multimeter.
2) Set your multimeter to read resistance in ohms (Ω) so you can easily test the PTC Relay
3) Put the probes in the M and S slots on the relay to check for open resistance. If the meter has a reading between 0-1 Ω, then the relay is still working. If the reading doesn’t change or it’s above 1 Ω, then it may be time to get a replacement.
4) If the relay has correct readings, then you should check the compressor next to see if it’s causing the problem.

The PTC Relay & Overload parts replacement costs around MYR10 to MYR15. Thus, it is worth to buy it online and have a try if it can solve your problem. Look for the correct parts, as there are many types of replacement parts of PTC Relay & Overload for various fridge / freezer models. 


If after changing PTC Relay & Overload, the fridge / freezer is still not producing cold air, it is highly suspected that the compressor is spoilt. 

To replace a compressor, you will need professional skills and tools. It is very costly, repair guy might charge you from MYR400 to MYR700 for the repair / replacement. For such a cost, you can actually buy a new unit of freezer. Not worth to proceed further repair.

To repair / replace compressor, it is out of my knowledge & capability at this moment. Will look into it in near future.

Reference Price (Brand New Unit):
Khind Freezer Model FZ102: RM499
Hisense Freezer Model FC125D4BWS: RM499

Monday, November 14, 2022

DIY Series 28: Car Battery "Pulse Repair" for Battery Sulfation Issue (in General Term: Old Battery Charging Before It's Dead)

1) Car Battery (Lead Acid Battery)

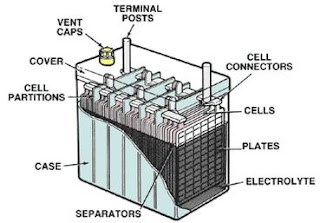
Lead acid batteries are chemical energy storage devices which are applied in various occasion. Lead acid battery types are divided depends on the functions and material, but the chemical principle is still similar which is using lead and lead dioxide as the negative and positive active materials of the battery and dilute sulfuric acid as the electrolyte. It has high power conversion efficiency, long cycle life, high terminal voltage, high safety, and high-cost performance with simple installation and maintenance features. At present, it is still the preferred chemical power source for car battery.

2) Car Battery Sulfation

At anytime, if your car battery is not at 100% charged, sulfation is occurring within the battery itself. This means that little crystals are forming on the lead plates and creating a “scale” on them. This scale inhibits the flow of electrons and doesn’t allow the battery to charge properly or release electricity properly.


When your battery has a build-up of sulfates (sulfation), the following can happen:
- Longer charging times
- Excessive heat build-up
- Shorter running times between charges
- Dramatically shorter battery life
- Complete battery failure (dead)

3) Reversible Sulfation

Reversible sulfation can often be corrected by applying an overcharge to an already fully charged battery in the form of a regulated current of about 200mA. The battery terminal voltage is allowed to rise to between 2.50 and 2.66V/cell (15 and 16V on a 12V mono block) for about 24 hours. Increasing the battery temperature to 50–60°C (122–140°F) during the corrective service further helps in dissolving the crystals.

While there are anti-sulfation devices available that will apply pulses to battery terminals to prevent and reverse sulfation on a healthy battery, they will not reverse the damage completely and are not always recommendedHowever, this is the approach that I would like to share here for the possible of prolong your car battery that having sulfation and looks / sounds like it is going to die-off soon. (Note: There will be no liability if there is any incident arises due to following this approach, try it at your own risk)

4) Battery Charger & Pulse Repair


You can easily get a Battery Charger & Pulse Repair device at affordable price from Lazada / Shopee. It costs about MYR30 to MYR50.

The model that I have is suitable for both car and motorcycle battery. It can be use on dry-cell (lead-acid) battery or AGM/GEL battery. (Note: Do not use it on Li-Ion Battery)

The normal charging mode can proceed to charge the low battery to completely full. For a complete charging, it might take about 7 to 8 hours of charging.

The "Pulse Repair" mode can help to repair the battery and extend battery lifespan. During the "Pulse Repair" Mode, it is also charging the battery in parallel. Of course, it cannot reactivate a totally dead battery or repair a severely damaged battery. It also cannot repair or restore the battery back to 100% new state. 

5) Dismantle / Reconnect Car Battery from / to Your Car

Before start charging your car battery, please dismantle the battery from your car to prevent any damages to your car's electronics devices.

After loosening the nut, remove the negative connector cable from the battery and push it far aside. It’s essential to make sure this cable is entirely out of the way and doesn’t come in contact with the battery again.

After removing the negative connector, repeat the exact same process for the positive connector. Again, ensure that you push the cable far away and out of contact with the battery.

When reconnect the car battery, do it in the reverse order, positive connector first then follow by negative connector. Finally, tighten the nuts and you are ready to turn the car ignition ON using your car key.

For details, you may refer to this WikiHow page.

6) Conclusion

I had personally tested the Battery Charger & Pulse Repair device to charge / repair my car battery. My car is having slow response to start with some abnormal sounds during ignition. After charging for 7 hours using "Pulse Repair" Mode, it seems like the issue was solved with smooth ignition process to start the car. Thus, I believe that the reversible sulfation process did improve the battery performance, and salvage the almost "going-to-die-off" battery.


For your information, my car battery was last changed on 01/May/2019 (about 3.5 years old already), and it is having white colour powder (sulfates) observed at the negative connector externally. 

I will continue to monitor if this old battery can prolong for how long after this treatment done.

It is my pleasure to share. Thank you.

Lastly, it is very useful if you can have the diagram below for emergency use, if you are required to have a "jump-start" when your car battery is totally die-off / flat in near future.