Sharp Sound Bar HT-SB115 is one of the cheapest sound bar available in the market that can support HDMI ARC (Audio Return Channel), where when connected to TV with HDMI ARC port, its volume control can be sync to TV with control using the TV remote control.
I choose this model because of the HDMI ARC feature and also its impressive outlook design.
In order to use the HDMI ARC feature, you will need to source a better high-speed HDMI cable. For example:
IDT HDMI Cable
I am satisfy with this sound bar performance since I have it. Almost immediately after 1 year, on 02/Mar/2022, suddenly it is no longer working (no sound) after I heard of a loud "THUD" explosion sound. There is no burnt smell and damage from external view.
Here is the unit that I am having. I tried to contact Sharp Service Center via email but no reply from Sharp until today. I am disappointed with Sharp Malaysia, thus I have decided to open it and see how to fix it myself.
When I opened up the center part of the housing, I found 2 pieces of PCB stacking on top of each other. 1st PCB is power supply module (12V, 30W), and 2nd PCB is the main control board.
I took out the 1st PCB (Power Supply Module), when I turned it over, I found black spots at certain discrete components (mainly 3 resistors & 1 capacitor), thus I suspect this is the root cause of the malfunction (power supply module was burnt).
In order to fix it, there are 2 possible solutions:
1) To identify the components and buy the parts to replace
2) To bypass the 1st PCB Board (Power Supply Module), connect external 12V directly to 2nd PCB
After searching online, I found out it is quite difficult to identify all the burnt parts and source it one by one. Thus, I choose to try on 2nd solution, getting an external power supply.
To proceed, I bought the following items:
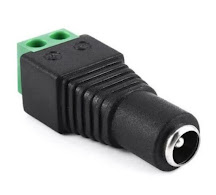
b)
DC Jack 2.1mm (or from local hardware shop)
Here are the steps on how to connect the external power supply module:
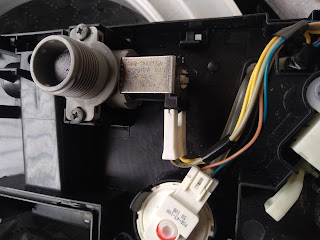
1) Removed the 1st PCB (Power Supply Module) from the housing
2) Desolder the 2-pin power plug socket from PCB and put it back to the housing to cover the hole after removed the 1st PCB
3) Drill a hole at the housing and connect the DC Jack onto the housing using silicon gun
4) Connect the cable from DC Jack to the 2nd PCB (Main Control Board) by modify the original cable provided (cut the socket and screw it to the DC Jack).
5) Before screw the housing back to Sound Bar, connect the external power supply module (12V, 4A) to the DC Jack and power on to test it
6) The sound bar is back to normal. It is now working with the new external power supply (12V, 4A)
To conclude, it is not so difficult to solve it, instead of waiting for Sharp Service Center to reply in "forever" loop.
Proud to be able to fix it with just below MYR$20.