Friday, December 08, 2023

Transportation Options for XMUM Students

This post is dedicated for XiaMen University Malaysia (XMUM) students.

XMUM is located at Bandar Sunsuria, very near to KLIA. It is just one station before KLIA Terminal 1 if you are travel by ERL (Express Rail Link) or more commonly known as KLIA Transit. The nearest ERL Station is Salak Tinggi Station.

It is merely 20min walking distance from XMUM campus to Salak Tinggi Station via Sunsuria City Le Park jogging track (with 24hrs CCTV monitoring).

  • Le Park Jogging Track (Satellite View)

From Salak Tinggi Station, there are many options. You can choose to travel via:

  1. KLIA Transit: Taking ERL all the way to KL Sentral (RM18.30) or KLIA Terminal 1 (RM4.90)
    For higher learning institutes students, refer [ KLIA Transit MyKad Concession Fares | KLIA Ekspres ]
  2. MRT/LRT: Taking ERL to Putrajaya Sentral (RM4.70), then transit to MRT Putrajaya, and you may opt to take LRT at certain connecting stations within KL
    For Integrated Transit Map, refer [ KL MRT, LRT, Monorail ]
    For 1-Day Pass, refer [ MyCity Pass - MyRapid ]
    For Student Card, refer [ Concession Cards - MyRapid ]
  3. Buses via KLIA Bus Terminal
    For KLIA bus terminal, refer [ KLIA Bus Terminal: theairportbus.com.my ]

It is very convenient to take a bus to other destination via KLIA Terminal 1.

Nearby Cities
From RM15.00: KLIA Terminal 1 - KL Sentral
From RM15.00: KLIA Terminal 1 - Pudu Sentral
From RM15.00: KLIA Terminal 1 - Klang (AEON Mall Bukit Tinggi)
From RM12.00: KLIA Terminal 1 - TBS (Terminal Bersepadu Selatan)
From RM12.00: KLIA Terminal 1 - Terminal One Seremban
From RM  9.00: KLIA Terminal 1 - Shah Alam (Terminal 17)
From RM  6.00: KLIA Terminal 1 - Putra Height (LRT Station)
etc...

Interstate
From RM24.60: KLIA Terminal 1 - Melaka Sentral
From RM35.00: KLIA Terminal 1 - Awana Genting Highland
From RM40.00: KLIA Terminal 1 - Muar
From RM44.00: KLIA Terminal 1 - Ipoh (Amanjaya)
From RM44.00: KLIA Terminal 1 - Lumut / Manjung / Sitiawan
From RM50.00: KLIA Terminal 1 - Batu Pahat
From RM56.00: KLIA Terminal 1 - Butterworth
From RM59.00: KLIA Terminal 1 - JB (Larkin)
From RM65.00: KLIA Terminal 1 - Terminal Sentral Kuantan
From RM70.00: KLIA Terminal 1 - Kuala Terengganu
etc...

Other useful links:

  1. KLIA Bus Terminal (theairportbus.com.my)
  2. Aerobus
  3. Jetbus Malaysia - Affordable & Comfortable Airport Shuttle!
  4. KLIA Transit | Train Timetable & Ticket Fares
  5. Salak Tinggi Park & Ride (Salak Tinggi KLIA Transit) Parking Rate

Friday, November 10, 2023

DIY Series 49: Water Heater Inlet Valve's Washer Replacement

Symptoms:

  • Water Heater inlet valve is not functioning to stop the water flow completely when it is turn OFF

Findings:

  • Washer inside the valve was worn-out. Need to get replacement washer.

Photos:

  1. Replacement Part: Washer (4pcs/pack)
  2. Water Heater inlet valve (front view)
  3. Water Heater inlet valve (side view)
  4. Water Heater inlet valve (inside view, without washer)
  5. To dismantle the knob, use hand to turn it anti-clockwise
  6. Get a new washer to be insert into its location
  7. New washer inserted into its location, place back the knob and turn it clockwise.


Tools required:

  • NIL

Costs involved:

  • Replacement Washer (4pcs/pack) = US$1 ~ US$2
Note:
  • Different brands might have different size of washer / parts. However, the same mechanism / concept should be common or similar across all types of valve / tap.


Tuesday, November 07, 2023

DIY Series 48: Washing Machine Suspension Rod Holder / Cup

 Symptoms:

  • Washing machine's drum tilted to one side
  • Loud sound during its operation, and unable to proceed washing process

Findings:

  • A suspension rod was found detached from its holder/cup
  • One of the holder/cup was broken, the other 3 holders/cups was in bad condition 

Photos:

  1. Location of Washing Machine Suspension Rods
  2. Disconnect the water inlet
  3. Unscrew the top cover screws (left side, 2 screws)
  4. Unscrew the top cover screws (right side, 2 screws)
  5. Checking the suspension rod holder/cup
  6. Example of L-Shape Hook Suspension Rod
  7. Example of Suspension Rod Holder/Cup


Tools required:

  • Screwdriver

Costs involved:

  • Suspension Rod Holder/Cup (4pcs) = US$4.00

Friday, November 03, 2023

DIY Series 47: Laptop CMOS Battery (CR2032)

CMOS batteries can last from 3-10 years. However, just like any other consumable item, they need to be replaced at some point.

Symptoms:

  • CMOS checksum is invalid
  • CMOS Reset (502)

Findings:

  • CMOS Battery need to be replaced

Photos:

  • Error Message during Power ON
  • Condition of old CMOS Battery


Tools required:

  • Screwdriver

Costs involved:

  • CMOS Battery (CR2032) = US$0.10 ~ US$0.30

Tuesday, October 31, 2023

DIY Series 46: Samsung Fridge Not Cooling

Symptoms:

  • Samsung Fridge is not cooling (also no light when open the door)

Findings:

  • When power OFF and ON again, compressor is not working
  • There is no switching sound at the back of fridge after power ON

Photos:

  1. Example for Samsung Fridge (Model: RT30MASS)
  2. Circuit Block Diagram & location of Defrost Timer
  3. Turn the Defrost Timer to RESET it, you will hear "tuck" sound


Tools required:

  • Screwdriver

Costs involved:

  • NIL

Note:

  • In case of the Defrost Timer is still not working after reset, replace it with a new unit
  • New Defrost Timer: US$3.50 ~ US$4.50

[Update] 2023-11-09
  • After merely more than 1 week, the Defrost Timer is malfunction again.
  • Hence, new part (TD-20C) is needed as replacement part.

Photos:
  1. Look for the small box at the back of fridge, detach it from the fridge.
  2. Open up the cover of the box.
  3. Removed the broken Defrost Timer from its location.
  4. Replacement done. Broken part was taken out.
  5. Turn the Defrost Timer slightly to activate it, you will hear "tuck" sound.


Thursday, October 19, 2023

DIY Series 45: Alpha EVO-i Fixing (Test/Reset & Heater)


Symptoms:

  • Test and Reset Button for ELCB trip check is not working
  • Heater LED is not ON, thus heater is not working

Findings:

  • Test & Reset Board (Board Model: SW-G) is malfunction
  • ELCB Board (Board Model: E2N) is malfunction

Photos:

  1. Block Diagram of Alpha EVO-i Water Heater
  2. Location of malfunction board (ELCB Board: E2N)
  3. Location of malfunction board (Test & Reset Board: SW-G)
  4. Faulty Push Button Switches of "Test" & "Reset"
  5. Faulty Parts on ELCB Board (Electrolytic Cap 470uF, CBB21 1uF, Varistor 14D471K)


Video (After Fixing):

  • 0:00:08: Testing on Test / Reset Button
  • 0:00:13: Testing on Heater LED ON
  • 0:00:23: Testing on Test / Reset Button
  • 0:00:28: Testing on Heater LED OFF
  • 0:00:40: Testing on water supply cut-off, Heater LED OFF
  • 0:00:42: Testing on water supply resume, Heater LED ON

Tools required:

Costs involved:

  • Push Button Switches (2pcs): US$0.05 x 2 = US$0.10
  • Electrolytic Cap 470uF: US$0.10
  • Varistor 14D471K: US$0.10
  • CBB21 1uF (105J630V): US$0.35
Note:
  • New ELCB Board (Model: E2N): US$18 ~ US$20
  • New Alpha EVO-i Water Heater: US$100 ~ US$120

Friday, October 13, 2023

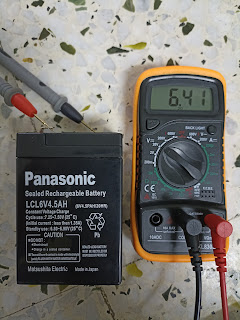
DIY Series 44: Mini Vespa (Toys Motorbike) Battery Replacement

Symptoms:

  • Unable to power on even charging for long hours. Suspect battery is aging.


Findings:

  • Battery is at low voltage level (below 3V)


Photos:

  1. Example of Mini Vespa (toys motorbike)
  2. Unscrew the screw on the battery compartment cover
  3. Detached the battery from the battery terminals (+ & -)
  4. Check the battery voltage level using multimeter
  5. Get the battery info and source for replacement battery
  6. Check the new battery voltage level before installing
  7. Connect both battery terminals (+ & -) and sealed it using hot glue gun


Tools required:

Costs involved:

  • Rechargeable Sealed Lead Acid Battery (6V 4.5Ah): US$3 ~ US$5

Monday, October 02, 2023

DIY Series 43: Hitachi Washing Machine (SF-110LJ) Error Code C9


Symptoms:

  • Old Hitachi Washing Machine (SF-110LJ) is having Error Code (C9)

Findings:

  • Suspect Lid Lock / Door Lock is malfunction

Photos:

  1. Location of lid lock / door lock mechanism
  2. Error Code C9 was displayed on the screen
  3. Unscrew top cover screw at left side
  4. Another 3 screws (right side, and at the back)
  5. Open up the top cover, unscrew 4 screws
  6. Location of the lid lock / door lock
  7. Detached the 4 cables attached to the lid lock / door lock
  8. Unscrew 2 screws to remove the lid lock / door lock
  9. Replacement Part: NTCY001CC3 (OEM Part)


Tools required:

  • Screwdriver, plier

Costs involved:

  • NTCY001CC3 (OEM Part) for Hitachi SF-110LJ: US$15