Tuesday, October 31, 2023

DIY Series 46: Samsung Fridge Not Cooling

Symptoms:

  • Samsung Fridge is not cooling

Findings:

  • When power OFF and ON again, compressor is not working
  • There is no switching sound at the back of fridge after power ON

Photos:

  1. Example for Samsung Fridge (Model: RT30MASS)
  2. Circuit Block Diagram & location of Defrost Timer
  3. Turn the Defrost Timer to RESET it, you will hear "tuck" sound


Tools required:

  • Screwdriver

Costs involved:

  • NIL

Note:

  • In case of the Defrost Timer is still not working after reset, replace it with a new unit
  • New Defrost Timer: US$3.50 ~ US$4.50

[Update] 2023-11-09
  • After merely more than 1 week, the Defrost Timer is malfunction again.
  • Hence, new part (TD-20C) is needed as replacement part.
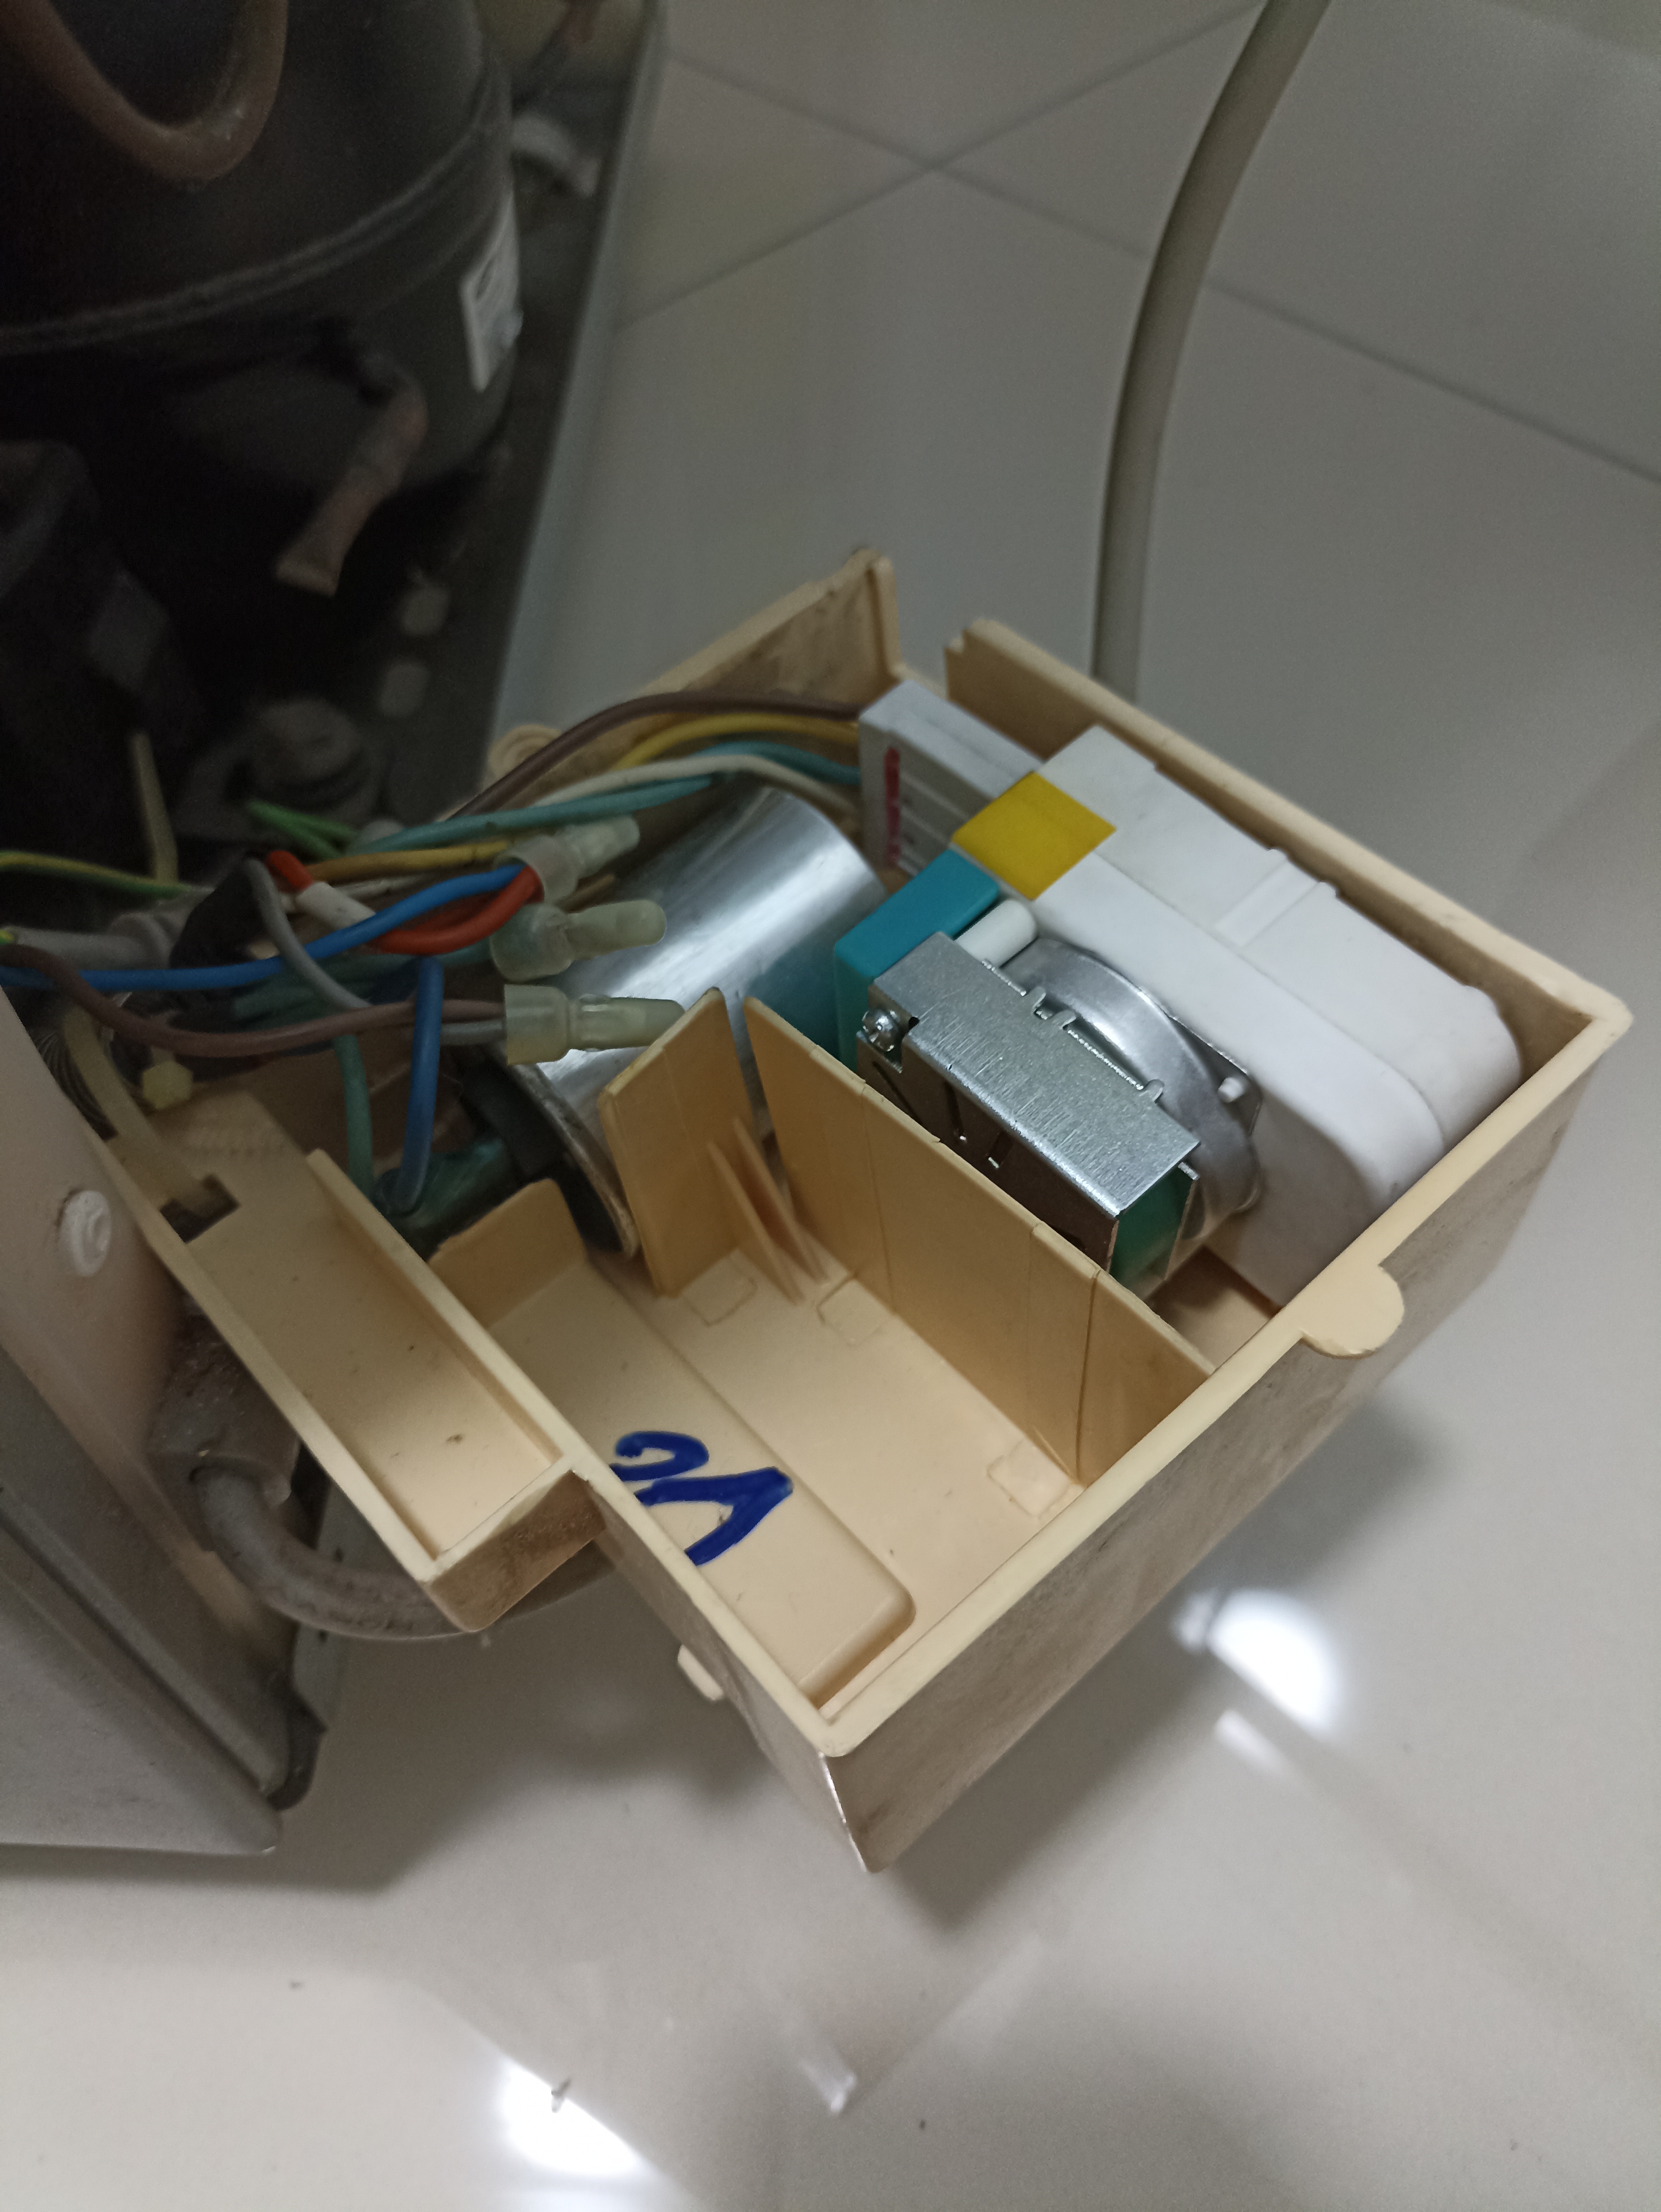
Photos:
  1. Look for the small box at the back of fridge, detach it from the fridge.
  2. Open up the cover of the box.
  3. Removed the broken Defrost Timer from its location.
  4. Replacement done. Broken part was taken out.
  5. Turn the Defrost Timer slightly to activate it, you will hear "tuck" sound.


Thursday, October 19, 2023

DIY Series 45: Alpha EVO-i Fixing (Test/Reset & Heater)


Symptoms:

  • Test and Reset Button for ELCB trip check is not working
  • Heater LED is not ON, thus heater is not working

Findings:

  • Test & Reset Board (Board Model: SW-G) is malfunction
  • ELCB Board (Board Model: E2N) is malfunction

Photos:

  1. Block Diagram of Alpha EVO-i Water Heater
  2. Location of malfunction board (ELCB Board: E2N)
  3. Location of malfunction board (Test & Reset Board: SW-G)
  4. Faulty Push Button Switches of "Test" & "Reset"
  5. Faulty Parts on ELCB Board (Electrolytic Cap 470uF, CBB21 1uF, Varistor 14D471K)


Video (After Fixing):

  • 0:00:08: Testing on Test / Reset Button
  • 0:00:13: Testing on Heater LED ON
  • 0:00:23: Testing on Test / Reset Button
  • 0:00:28: Testing on Heater LED OFF
  • 0:00:40: Testing on water supply cut-off, Heater LED OFF
  • 0:00:42: Testing on water supply resume, Heater LED ON

Tools required:

Costs involved:

  • Push Button Switches (2pcs): US$0.05 x 2 = US$0.10
  • Electrolytic Cap 470uF: US$0.10
  • Varistor 14D471K: US$0.10
  • CBB21 1uF (105J630V): US$0.35
Note:
  • New ELCB Board (Model: E2N): US$18 ~ US$20
    • E2N Board suitable for Model RS-E, EVO-i, EVO-E, X5-E, X5-i, EZY-i, FX-i.
  • New Alpha EVO-i Water Heater: US$100 ~ US$120

Friday, October 13, 2023

DIY Series 44: Mini Vespa (Toys Motorbike) Battery Replacement

Symptoms:

  • Unable to power on even charging for long hours. Suspect battery is aging.

Findings:

  • Battery is at low voltage level (below 3V)

Photos:

  1. Example of Mini Vespa (toys motorbike)
  2. Unscrew the screw on the battery compartment cover
  3. Detached the battery from the battery terminals (+ & -)
  4. Check the battery voltage level using multimeter
  5. Get the battery info and source for replacement battery
  6. Check the new battery voltage level before installing
  7. Connect both battery terminals (+ & -) and sealed it using hot glue gun


Tools required:

Costs involved:

  • Rechargeable Sealed Lead Acid Battery (6V 4.5Ah): US$3 ~ US$5

Monday, October 02, 2023

DIY Series 43: Hitachi Washing Machine (SF-110LJ) Error Code C9


Symptoms:

  • Old Hitachi Washing Machine (SF-110LJ) is having Error Code (C9)

Findings:

  • Suspect Lid Lock / Door Lock is malfunction

Photos:

  1. Location of lid lock / door lock mechanism
  2. Error Code C9 was displayed on the screen
  3. Unscrew top cover screw at left side
  4. Another 3 screws (right side, and at the back)
  5. Open up the top cover, unscrew 4 screws
  6. Location of the lid lock / door lock
  7. Detached the 4 cables attached to the lid lock / door lock
  8. Unscrew 2 screws to remove the lid lock / door lock
  9. Replacement Part: NTCY001CC3 (OEM Part)


Tools required:

Costs involved:

  • NTCY001CC3 (OEM Part) for Hitachi SF-110LJ: US$15

Wednesday, September 27, 2023

DIY Series 42: Pensonic Slow Cooker (PSC-301) Malfunction


Symptoms:

  • All status LEDs (Low, Auto, High) are working fine when Power ON, but slow cooker is not heating up.


Findings:

  • Found that the thermistor is having open circuit.
  • This thermistor should be NC (Normally Closed) by default.


Photos:

  1. Turn the slow cooker upside down to start to dismantle the external housing
  2. Unscrew the center nut (1st nut)
  3. Unscrew the 2 screws of power cord
  4. Remove the power cord cover so that the power cord is easily pull out (when needed)
  5. Remove the knob cover
  6. Remove the nut under the knob cover using plier
  7. Push the knob into the housing
  8. Remove the inner metal base pot from the external housing
  9. Unscrew 2nd nut from the screw to take out the Earth Line
  10. Unscrew 3rd nut to remove the thermistor (use plier) and check using multimeter, replace with new thermistor (for this case)
  11. Thermistor: KSD301, 250V, 10A, 150°C. (Original part was 145°C)
  12. Info on NC (Normally Closed) and NO (Normally Open)


Tools required:

Costs involved:

Thermistor (KSD-301, 250V, 10A, 150 Degree Celsius, NC): 

  • Online Store: US$1 ~ US$2
  • Physical Store: US$2 ~ US$3


Thursday, September 21, 2023

DIY Series 41: Repair Blown LED Light Bulb (E14 Type, 16W)


Symptoms:

  • LED Light Bulb is not working when Power ON, suspect some parts were burnt

Findings: 

  • Found burnt mark at 3.9kOhm resistor (Marking: 392)
  • Use multimeter to check the resistance on each resistor
  • 2 out of 3 resistors were blown, need replacement parts 

Photos:

  1. E14 Type LED Light Bulb (16W)
  2. Location where the 3.9kOhm resistors were blown
  3. Bought a light bulb socket (E27 Type) and converter (E27 to E14) for easy testing
  4. E14 Type LED Light Bulb is working now after fixing


Tools required:

Costs involved:

  • SMD Resistor (3.9kOhm, 2pcs): US$0.02

Wednesday, September 20, 2023

DIY Series 40: DIY Repair Rubine IA991D DC Pump Instant Water Heater (No Hot Water, Red LED is OFF)


Symptoms:

  • Heater LED is not ON. No hot water.


Findings: 

  • Flow Sensor: Magnet misaligned, reed switch is not ON/OFF accordingly
  • Thermistor: Thermistor at the top of tank need to be reset (NC: Normally Closed).


[Note: Turn OFF the power supply before any installation / checking / debugging] 


Videos:

  1. Test the flow sensor using multimeter (flip it over to let the magnet touch the reed switch). Multimeter shows short circuit (with beep sound) means flow sensor is working fine.
  2. Test the Heater is working or not by install it back with power and water supply. Red LED will be turned ON and hot water will flow out if flow sensor & thermistor is in good condition.


Photos:

  1. Rubine IA991D DC Pump Instant Water Heater (with internal block diagram)
  2. Dismantle of power supply wires (E/L/N)
  3. Unscrew 4 pcs of screws to take it down from the wall
  4. Checking on flow sensor (reed switch and magnet) functionality, remove the reed switch cover
  5. Checking on the thermistor functionality, press the button on top (to reset) if it is not shorted
  6. Power ON (without water supply) and test the flow sensor (refer 1st video above)
  7. Power ON (with water supply) and test the heater function (refer 2nd video above)


Tools required:


Costs involved:

  • NIL (New Flow Sensor costs about US$15)
  • NIL (New Thermistor costs about US$1 ~ US$2)

Action Taken:

  • Dismantle the flow sensor, take out the magnet and clean it, then realign it back to work with reed switch correctly.
  • Reset the thermistor if it is not shorted by default (NC: Normally Closed).
  • Thermistor might need to be replaced if it is frequently disconnected in near future.