Sunday, August 07, 2022

DIY Series 27: Fixing Copper Pipe Leaking

Copper pipe supposed to be very reliable type of piping. Indeed, it is very durable, installation was done since 2007, and it was in good condition without any issue for the past 15 years.

On a Sunday morning, it was noticed that there was a leakage at the bathroom where water leakage observed at a corner of copper pipe. 


Further checking found out that there is a pin hole at the copper pipe, under the aging and rusted pipe holder.


Prior to this, I don't have any experience on fixing the copper pipe, and it was a Sunday morning, it is difficult to get a plumber to come for the fixing. Thus, I started to study online, for a solution. Finally I found a youtuber shared several methods to fix the copper pipe leakage.

1st solution: Use a hose clipper (with a piece of rubber)
2nd solution: Use soldering iron to solder on it.
3rd solution: Use copper welding
4th solution: Use a 15mm socket (Copper-to-Copper) fitting to replace the leaking area

As there is no immediate parts available in hands, I proceeded to try on 1st solution, as temporary solution. Use a hose clipper to hold a piece of rubber to cover over the leaking area. After fixing, there is no more leakage and it was there for a week while I ordered some parts from online platform.


For permanent solution, I would like to try on the 4th solution (sounds better and easier). On the same day, I placed order for copper pipe cutter, copper sockets, and even a 3' long copper pipe (for backup). Then only I realized that copper pipe is so expensive, almost nearly MYR40 (include delivery) for just 3' long copper pipe.

Few days after, all the parts were received. Together with other tools that I have, I started my fixing on the next weekend. Of course, the main parts are copper pipe cutter and the copper socket.


For the 1st time, I started to use the copper cutter. The operation is so easy, much more easier than I expected. Just locked it to the copper pipe (after dismantle from the wall) and twist it for few cycles, the pipe will be cut into two. I make 2 cuts in total (to remove the small area of the pin hole detected area). 

Note: To dismantle the copper pipe, it might be challenging too, as it was already 15 years old. That's why I bought the spare 3' copper pipe as spare.


To replace the pin hole leakage area with the new copper socket, make sure you cut the correct length as equal (or almost) to the length of the copper socket. You will need 2 plumbing pliers / spanners to tighten the copper to the copper socket.


Now, connect it back to it original location on the wall and re-adjust the holder back to its original condition. 


Now, the leaking is fixed. To conclude, you can try using the temporary solution (1st solution) during emergency (especially during weekend / holiday) and later try the permanent solution (4th solution) once you have the parts / tools ready.


I personally feel that 2nd solution (soldering) is not that safe due to solder is not really good for health, and 3rd solution (copper welding) required more complicated tools and it is most likely involved higher skill and cost.

The total cost involved (for the copper pipe cutter and the copper socket) is below MYR20. With this knowhow, it might easily save you about MYR100 to MYR200 labour fee (depends on your local plumber charges).

Wednesday, April 20, 2022

Unifi "Connected But No Internet"

Last night after thunderstorm strike my housing area, my Unifi connection was broken.
Issue: Connected but No Internet

Checking at the Dlink Router show there is no connection to the router from external.
It seems like the router setting was return to factory reset due to thunderstorm.
The default IP is 192.168. 0.1, or using the link: http://dlinkrouter.local


In the router page, choose PPPoE connection and input your Username and Password.
I tried to input the last known password received from Unifi. 


Confirm the setting and proceed to "Next"


The WiFi router has been configured. Ready to test the WiFi connection.


Seems like the internet connected had been established. However, WiFi is connected but no internet.


As it was already 11:50pm, the Unifi "100" hotline is no longer in service after 10:00pm.
Thus, I proceed to search and try troubleshooting @ EasyFix (https://easyfix.unifi.com.my/auto/) using smartphone mobile data. 


Once completed the diagnosis online, copy the diagnosis outcome and continue reporting it to LiveChat (https://livechat.tm.com.my/UnifiLiveChat/LiveChat.aspx). This LiveChat is available 24/7. 

Submit the Diagnosis Report link copied from EasyFix, and tell the customer support what is your problem.


Customer support will offer to reset the PPPoE password for you. The new password will be send out via SMS and also immediately reflected in your WiFi Router setting. Or, worst case, you may need to manually input the password.


The SMS will be send out to your mobile phone. Example:
RM0 Unifi:Your service request to reset your password (Ref no:1-5xxxxxxxxxxx) has been completed. Your new HSI password is: xxXxxxXxx. Thank you.

By now, the internet connection will resume back to normal. 
And it is already 01:00am when it was solved. Just for sharing.

Sunday, April 10, 2022

DIY Series 26: Wall Mounted Foldable Table


Wall-mounted foldable table are great space-saving ideas. Mount it at your preferred height at any wall is easy at minimum cost involved.

Just place an order online, according to your own preference. I personally preferred rubber wood type, than the compressed wood with glossy lamination. As for the table size, I choose 100cm length X 40cm width. Most of the foldable table comes with the bracket bundled.

Measure the height that you want to fix the table. Normally between 70cm to 72cm will be comfortable height (depends on individual preference) . This time, I choose 72cm height from the floor.

Get a measuring tape and leveler to help on the measurement and table surface level precisely.


During 1st attempt of installation, I pushed the table top to the wall leaving no gap in between. Later, I found out that the foldable table is not able to fold up to 90 degree as the bracket need certain clearance from wall in order to make it folded.


Then, I tried for 2nd attempt. make a clearance of 2cm from wall and rescrew the table top again.


This time, the table top is able to be folded up to 90 degree, which looks better and nicer when folded.


Here is the newly installed wall mounted foldable table.

Monday, March 21, 2022

DIY Series 25: Fixing Panasonic NA-F75S7 Washing Machine Feeding Valve (Water Inlet Valve)

 This is about repair / fixing of Panasonic Washing Machine (Model: NA-F75S7) water inlet valve (feeding valve).

Before fixing, this is the video on how the incoming water flow into washing machine. Sometimes even worst than this, at worst case, no water will flow in at all (and even make loud noise).


To solve this problem, you will need to source a new unit of water inlet valve (feeding valve) as below. The part number is FVS-144V1:

You can buy from either online platform or get it from local electronics trading shop. The price ranging from RM20 to RM30 (OEM Parts) and RM42 to RM78 (Panasonic Original Parts).

Let's start the repair / fixing as below:

1) Disconnect the incoming pipe from washing machine

2) Unscrew the 4 screws at both side of washing machine


3) Unlatch the latch (left side) and the spring (right side) to remove the top cover lid


4) Lift up the cover and unscrew the 4 screws at the black plastic tray (under the top cover)


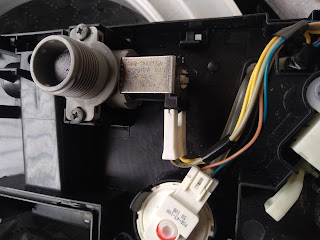
5) You will see the water inlet valve (feeding valve) placed inside the black plastic tray.

6) Unscrew the 2 screws and unplug the wiring connector, you may now remove the malfunction water inlet valve (feeding valve)


7) Remove the black rubber from old part to new part


8) Place the new part onto its original location and screw it, then reconnect back the wiring connector


9) Put back the black plastic tray, screw it and then assemble back the top cover.


10) Reconnect back the spring (right side) and the latch (left side) in order to secure the top cover lid


11) Power ON the washing machine and you will now see the water flow into washing machine at normal condition

The Panasonic washing machine NA-F75S7 is back to normal. Have a try!


Note: According to replacement part seller, the OEM parts might have slight misalignment at the 2 connector pins, need to adjust manually in order to allow it to slot into the wiring connector. Thus, I choose to buy the original parts this time.